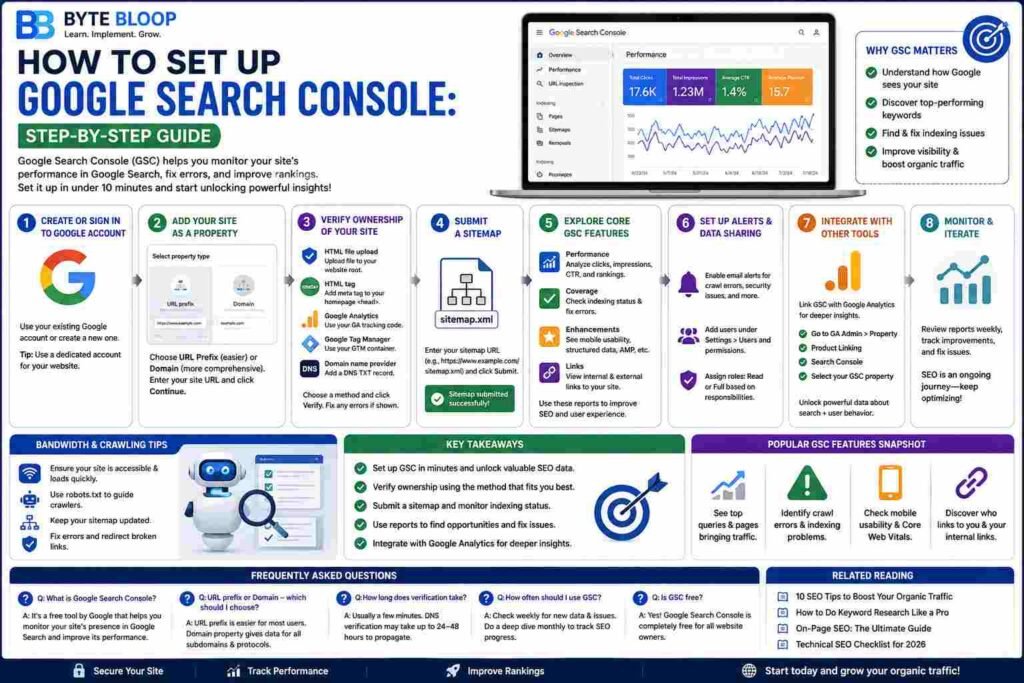
How to Set Up Search Console: Step‑by‑Step Guide
Introduction
Google Search Console (GSC) is the backbone of any SEO strategy. It lets you see how Google crawls and indexes your site, spot errors, and identify opportunities for improvement. Setting up GSC is surprisingly quick—most users finish the process in under ten minutes—yet the data it provides can drive significant traffic gains. Whether you’re a blogger, a small business owner, or a digital marketer, having a verified GSC account is essential for staying ahead of the competition. This guide walks you through every step, from creating a Google account to verifying ownership and configuring essential settings.
Step 1: Create or Sign Into a Google Account
GSC requires a Google account. If you already use Gmail, Google Drive, or any Google service, simply log in. New users can create an account in less than a minute. Using a dedicated Google account for your site keeps analytics and search data separate from personal or other business accounts.
Step 2: Add Your Site as a Property
Navigate to https://search.google.com/search-console and click “Start now.” You’ll be prompted to choose a property type. Two options exist:
- URL Prefix – Best for sites that may change domain or use multiple subdomains. You enter the full URL (e.g.,
https://www.example.com). - Domain – Requires DNS verification but gives you data for all protocols and subdomains. Ideal for larger sites.
For most beginners, URL Prefix is sufficient. Enter your site’s exact URL, including the protocol, and click “Continue.”
Step 3: Verify Ownership
Google must confirm you own the site. Several methods are available; choose the one that fits your setup:
- HTML file upload – Download a small file and upload it to your site’s root directory. Then click “Verify.”
- HTML tag – Add a meta tag to your homepage’s
<head>section. After pasting, click “Verify.” - Google Analytics – If you already run GA, select this option. Google checks for the tracking code on your pages.
- Google Tag Manager – Similar to GA but uses GTM containers.
- Domain name provider – Add a TXT record to your DNS settings. This method is reliable for domain properties.
Once the verification method is in place, click “Verify.” If you encounter errors, double‑check the file path, tag placement, or DNS propagation status.
Step 4: Submit a Sitemap
After verification, GSC will prompt you to submit a sitemap. A sitemap is a structured XML file that lists all important URLs. Most CMS platforms (WordPress, Shopify, Squarespace) generate sitemaps automatically (e.g., https://www.example.com/sitemap.xml). Enter the sitemap URL and click “Submit.” GSC will crawl the sitemap and provide indexing status.
Step 5: Explore Core GSC Features
Once your site is verified, you’ll see a dashboard with key metrics:
- Performance – Click‑through rates, impressions, average position, and top queries.
- Coverage – Errors and warnings that prevent pages from indexing.
- Enhancements – Mobile usability, structured data, and AMP status.
- Links – Internal and external links pointing to your site.
Use these reports to identify high‑potential keywords, fix crawl errors, and improve on‑page SEO.
Step 6: Set Up Alerts and Data Sharing
GSC can email you when critical issues arise. Navigate to Settings > Email notifications to enable alerts for crawl errors or security issues. Additionally, you can share GSC access with team members by adding users under Settings > Users and permissions. Assign roles like “Read” or “Full” based on responsibilities.
Step 7: Integrate with Other Tools
Link GSC to Google Analytics for deeper insights. In Analytics, go to Admin > Property > Product Linking > Search Console. Choose the GSC property you created. This integration allows you to view search queries alongside user behavior metrics.
Step 8: Monitor and Iterate
SEO is an ongoing process. Review your GSC reports weekly. Track improvements in impressions, CTR, and rankings. Address any new errors promptly. Over time, you’ll see measurable gains in organic traffic.
Key Takeaways
- Verify ownership quickly with HTML tag or file upload
- Submit a sitemap to help Google index all pages
- Use Performance reports to target high‑potential keywords
- Set up email alerts for crawl errors
- Integrate GSC with Google Analytics for deeper insights
Frequently Asked Questions
What is Google Search Console and why is it important?
Google Search Console is a free tool that lets site owners see how Google crawls, indexes, and displays their pages. It provides insights into performance, errors, and opportunities to improve search visibility.
Which property type should I choose, URL prefix or Domain?
URL Prefix is simpler and works for most sites. Domain gives data for all subdomains and protocols but requires DNS verification. Choose based on your site’s structure.
What are the most common verification methods?
HTML file upload, HTML tag, Google Analytics, Google Tag Manager, and DNS TXT record are the primary options. Pick the one that aligns with your technical setup.
How often should I review my Search Console reports?
A weekly review is ideal for catching new errors and tracking performance trends. Monthly deep dives help assess long‑term progress.
Can I share GSC access with my team?
Yes. In Settings > Users and permissions, add team members and assign roles like Read or Full to collaborate on SEO tasks.
Conclusion
Based on the available information and industry analysis, setting up Google Search Console is a foundational step for any website looking to optimize search performance. By verifying ownership, submitting sitemaps, and regularly monitoring core reports, site owners can identify crawl issues, boost rankings, and ultimately drive higher organic traffic. The tool’s integration with Google Analytics further enriches data, enabling a data‑driven SEO strategy that adapts to changing search dynamics.
Related Reading
- 10 SEO Tips to Boost Your Organic Traffic