How to Use Git: Step-by-Step Guide for Beginners in 2026
Introduction
Git is a distributed version control system used to track changes in software projects and collaborate with other developers. Instead of relying on folders filled with different versions of the same project, Git records changes in a repository so developers can review history, create separate development branches and return to earlier versions when necessary.
Git is commonly used together with platforms such as GitHub, which provide remote repositories and collaboration features such as pull requests, code review and branch management. GitHub’s documentation describes branches as isolated spaces for developing features, fixing bugs or experimenting before changes are merged into the main codebase.
Whether you are learning programming, working on a personal project or collaborating with a development team, learning how to use Git is an important practical skill.
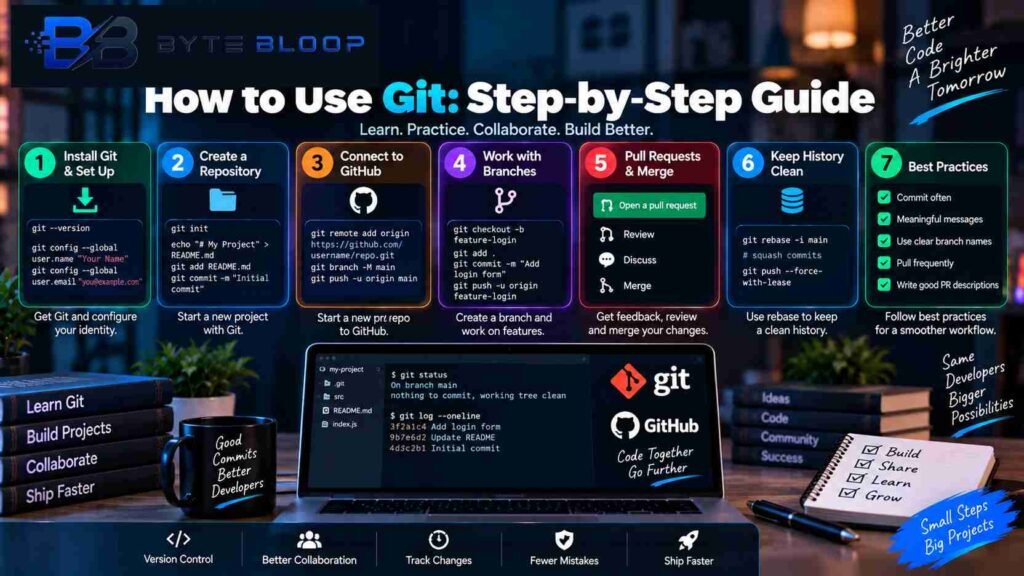
In this guide, you will learn how to install Git, configure your identity, create a repository, commit files, connect a project to GitHub, create branches, open pull requests, rebase a branch and recover from common mistakes.
What Is Git?
Git is a distributed version control system that keeps track of changes made to files in a project.
With Git, you can:
- Track project history
- See what changed between versions
- Create and manage branches
- Collaborate with other developers
- Restore earlier versions
- Experiment without changing the main branch
- Share code through remote repositories
A Git repository contains the information Git needs to track the project, including its history and references to branches and commits.
You can use Git locally without GitHub or another hosting service. GitHub is a separate platform that can host Git repositories and provide collaboration tools around them.
Git vs GitHub: What Is the Difference?
Beginners often confuse Git and GitHub, but they are not the same thing.
Git is the version control software running on your computer.
GitHub is an online platform that hosts Git repositories and provides additional collaboration features.
Think of it this way:
Git = version control system
GitHub = online platform for hosting and collaborating around Git repositories
You can learn Git without creating a GitHub account, but GitHub is useful when you want to share your projects or collaborate with other developers.
GitHub’s official documentation provides additional information about working with repositories and collaboration.
Basic Git Concepts You Should Know
Before running Git commands, it helps to understand a few important terms.
Repository
A repository, often called a repo, is a project tracked by Git.
It contains the files you are working on as well as Git’s version history.
Commit
A commit is a saved snapshot of changes in your Git history.
For example:
git add .
git commit -m "Add login page"
The commit message explains what was changed.
Branch
A branch creates a separate line of development.
You can use one branch for the main project and another for a new feature or bug fix.
GitHub recommends branches as a way to isolate development work before it is merged into the default branch.
Remote
A remote is a reference to another copy of a repository, commonly hosted online.
For example:
originis a commonly used name for the main remote repository.
Pull Request
A pull request, often abbreviated as PR, proposes changes from one branch to another for discussion, review and merging.
GitHub’s current pull-request workflow allows developers to create a branch, make commits, open a pull request, request reviews and then merge the changes.
Step 1: Install Git
The first step is installing Git on your computer.
For Windows, download Git from the official Git website:
As of September 2026, the official Git for Windows page lists Git 2.55.0 as the latest maintained build and shows it was released on August 20, 2026.
After installation, open Command Prompt, PowerShell or Git Bash.
Run:
git --versionYou should see a Git version number.
For example:
git version 2.55.0The exact version may change as new releases are published.
Step 2: Configure Your Git Identity
Git records an author name and email address in commits.
Set them with:
git config --global user.name "Your Name"
git config --global user.email "you@example.com"
To check your settings:
git config --global --listYou can also check individual values:
git config --global user.name
git config --global user.email
Use an email address you are comfortable associating with your commits. If you plan to connect your commits with GitHub, use an email configuration that matches how you want your contributions attributed on GitHub.
Step 3: Create a Project Folder
Create a project folder and move into it.
For example:
mkdir my-project
cd my-project
You can also use an existing project folder.
Check its contents with:
lsOn Windows Command Prompt, you can use:
dirStep 4: Initialize a Git Repository
Inside the project directory, run:
git initThis initializes a Git repository in the folder. Git’s official documentation describes git init as creating an empty Git repository or reinitializing an existing one.
You should see a message similar to:
Initialized empty Git repositoryA hidden .git directory is created to store Git’s repository data.
You can check the repository status using:
git statusStep 5: Create or Add Project Files
Suppose your project contains:
index.html
style.css
script.js
You can check which files Git sees with:
git statusGit may show them as untracked files.
Untracked means Git sees the files but they have not yet been added to the staging area.
Step 6: Stage Your Changes
Git uses a staging area to prepare changes for the next commit.
To stage a specific file:
git add index.htmlTo stage several files:
git add index.html style.css script.jsTo stage all changed files in the current project:
git add .Then check the status:
git statusThe files should now appear as staged changes.
Step 7: Create Your First Commit
Once your changes are staged, create a commit:
git commit -m "Add initial project files"A commit records a point in your project’s history.
Good commit messages should describe the change clearly.
Examples:
git commit -m "Add homepage layout"git commit -m "Fix navigation menu"git commit -m "Update authentication flow"Avoid vague messages such as:
update
changes
stuff
final
Clear commit messages make project history easier to understand later.
Step 8: Create a GitHub Repository
Now you can create an online repository on GitHub.
Visit:
Sign in and select New repository.
GitHub’s current repository creation workflow allows you to choose a repository name, description and visibility, along with optional initial content such as a README.
For a simple project that already exists locally, creating an empty GitHub repository can make the first push simpler because your local repository already has its own history.
After creating the repository, copy its HTTPS URL.
It may look like:
https://github.com/yourusername/my-project.gitStep 9: Connect Your Local Repository to GitHub
Inside your local project folder, run:
git remote add origin https://github.com/yourusername/my-project.gitCheck the remote:
git remote -vYou should see something similar to:
origin  https://github.com/yourusername/my-project.git (fetch)
origin  https://github.com/yourusername/my-project.git (push)
origin is simply the conventional name for the remote repository.
Step 10: Set the Main Branch
Many modern GitHub repositories use main as the default branch name. GitHub’s documentation states that new repositories use main by default unless the default branch naming is configured differently.
To rename your current branch to main:
git branch -M mainCheck the branch:
git branchYou should see:
* mainStep 11: Push Your Code to GitHub
Now push your local branch:
git push -u origin mainThe -u option establishes the upstream relationship between your local branch and the remote branch.
After the first push, future pushes can often be performed with:
git pushRefresh your GitHub repository and your project files should now appear online.
Step 12: Check Your Git Status
One of the most useful Git commands is:
git statusUse it frequently.
It tells you things such as:
- Your current branch
- Modified files
- Untracked files
- Staged changes
- Whether your working tree is clean
For example:
On branch main
nothing to commit, working tree clean
This means Git does not currently see uncommitted changes.
Step 13: Create a Feature Branch
One of the biggest advantages of Git is branching.
Instead of making every change directly on main, create a separate branch for your feature.
A traditional command is:
git checkout -b feature-loginModern Git also provides the dedicated switch command:
git switch -c feature-loginThe official Git documentation describes git switch -c as creating and switching to a new branch.
For beginners, git switch -c is often easier to understand because it clearly represents the branch-switching operation.
Step 14: Make Changes on the Feature Branch
Now work on your feature.
For example, you might modify:
login.html
style.css
script.js
Check the changes:
git statusYou can inspect exactly what changed using:
git diffThis is useful before staging and committing your work.
Step 15: Commit Feature Changes
Stage the changes:
git add .Then commit:
git commit -m "Implement login form"It is generally easier to understand project history when commits represent logical pieces of work rather than one enormous collection of unrelated changes.
GitHub’s pull-request quickstart also recommends keeping changes focused and using small, meaningful commits.
Step 16: Push the Feature Branch to GitHub
Push your feature branch:
git push -u origin feature-loginAfter the branch is uploaded, GitHub can display the branch and provide options for creating a pull request.
Step 17: Create a Pull Request on GitHub
Open your repository on GitHub.
Select the option to create a pull request for your new branch.
Set:
Base: main
Compare: feature-login
Add:
- A descriptive title
- A summary of the changes
- Testing information
- Screenshots where useful
- Any relevant issue references
GitHub’s official pull-request workflow describes a PR as a proposal to merge changes from one branch into another, with review and discussion before merging.
Step 18: Review and Merge the Pull Request
Before merging, review:
- Changed files
- Commit history
- Tests
- Potential bugs
- Comments from reviewers
If everything is ready, the pull request can be merged into main.
After merging, you can usually delete the feature branch on GitHub.
Deleting a branch after its work is merged keeps the repository easier to navigate. GitHub documents branch deletion as part of normal branch management.
Step 19: Delete the Local Feature Branch
After the branch has been merged, switch back to main:
git switch mainThen delete the local feature branch:
git branch -d feature-loginIf the remote branch has not already been deleted on GitHub, you can remove it with:
git push origin --delete feature-loginStep 20: Keep Your Local Main Branch Updated
When working with other developers, your local main may become outdated.
First fetch the latest remote information:
git fetch originThen update your local branch:
git pull origin mainBefore beginning new work, it is useful to make sure your base branch is current so that your feature branch starts from the latest project state.
Step 21: Understand Git Rebase
Rebase moves a series of commits onto another base commit.
For example:
git rebase mainInteractive rebase allows you to edit, reorder, combine or remove commits. Git’s documentation specifically describes interactive rebase as a way to edit a series of commits.
For example:
git rebase -i HEAD~4This lets you review the last four commits.
You may see:
pick 1234567 Add login form
pick 2345678 Fix login button
pick 3456789 Update login validation
pick 4567890 Fix typo
You can change later commits to:
pick 1234567 Add login form
squash 2345678 Fix login button
squash 3456789 Update login validation
fixup 4567890 Fix typo
The exact result depends on which commits you select and how you edit the rebase plan.
Step 22: Be Careful With Rebase
Rebase changes commit history.
That means you should be careful when rebasing commits that other people are already using.
Git’s documentation warns that rebasing shared history has implications for collaborators.
For a personal feature branch that has not yet been merged, interactive rebase can be useful for organizing commits before opening or updating a pull request.
Step 23: Push a Rebasing Branch Safely
After rebasing a branch that has already been pushed, Git may reject a normal push because the remote history is different.
In that situation, you may use:
git push --force-with-lease origin feature-loginThe important part is:
--force-with-leaseGit documents this option as a safer alternative to blindly forcing an update: it checks that the remote reference is still at the expected value before replacing it.
Avoid casually using:
git push --forceon shared branches because rewriting remote history can remove commits that another contributor has already pushed.
Useful Git Commands for Beginners
Here is a practical command reference:
| Command | Purpose |
|---|---|
git --version | Check Git version |
git config --global user.name | View configured username |
git config --global user.email | View configured email |
git init | Create a Git repository |
git status | Check repository status |
git add . | Stage changes |
git commit -m "message" | Create a commit |
git log | View commit history |
git diff | View unstaged changes |
git branch | List branches |
git switch -c branch-name | Create and switch to a branch |
git switch main | Switch branches |
git merge branch-name | Merge a branch |
git fetch | Download remote references |
git pull | Fetch and integrate remote changes |
git push | Upload commits |
git clone URL | Copy a remote repository locally |
git remote -v | View remote URLs |
git rebase main | Rebase current branch |
git stash | Temporarily store local changes |
Common Git Mistakes and How to Avoid Them
1. Forgetting to Check Git Status
Before committing, run:
git statusThis helps you understand which files are modified, staged or untracked.
2. Making Every Change Directly on Main
Directly developing everything on main can make collaboration more difficult.
Use feature or topic branches for isolated work.
3. Writing Unclear Commit Messages
Instead of:
git commit -m "update"write:
git commit -m "Fix mobile navigation menu"The second message provides useful context when reviewing project history.
4. Committing Sensitive Files
Do not accidentally commit:
- Passwords
- API keys
- Private credentials
- Secret configuration files
- Local environment files
A .gitignore file can help prevent specific files from being tracked.
For example:
.env
node_modules/
dist/
5. Rebasing Shared Branches Without Coordination
Rebase rewrites commit history, so be careful when other developers are working from the same branch.
6. Force-Pushing Carelessly
Use --force-with-lease rather than blindly forcing shared branch updates when a rewritten history really is required. Git specifically documents the lease mechanism as a check against overwriting newer remote work.
Git Best Practices
Commit Small, Logical Changes
A commit should ideally represent one meaningful piece of work.
Instead of one giant commit:
Update projectyou could have:
Add login formAdd login validationFix mobile login layoutUse Clear Branch Names
Useful examples include:
feature/search-bar
feature/user-login
bugfix/mobile-menu
bugfix/payment-error
docs/readme-update
The exact naming convention can vary between teams.
Pull or Fetch Regularly
Keeping your branch informed about upstream changes helps reduce surprises when you eventually integrate your work.
Review Before You Commit
Use:
git diffand:
git statusbefore committing.
This gives you a chance to catch accidental changes.
Keep Pull Requests Focused
A focused pull request is easier for reviewers to understand.
GitHub’s own quickstart recommends keeping a first pull request focused and simple because smaller changes are easier to review and merge.
Advanced Git Topics
Once you understand the basic workflow, you can explore additional Git features.
Git Stash
Temporarily save local modifications:
git stashRestore them later:
git stash popThis can be useful when you need to switch branches without committing unfinished work.
Git Hooks
Git hooks can automatically run scripts at specific stages of the Git workflow.
For example, a team can use hooks to perform checks before certain commits or pushes.
Git Submodules
Submodules allow one Git repository to reference another repository as a dependency.
They can be useful in specific project structures but add additional complexity, so beginners generally do not need them immediately.
Git Reflog
The reflog records movements of references such as HEAD and can sometimes help recover commits or branch states after an accidental reset or other mistake.
It is an especially useful recovery tool once you become more comfortable with Git.
A Simple Git Workflow for Beginners
For many projects, the workflow can look like this:
Create / Clone Project
        ↓
Check git status
        ↓
Create Feature Branch
        ↓
Write Code
        ↓
git add
        ↓
git commit
        ↓
git push
        ↓
Open Pull Request
        ↓
Review + Test
        ↓
Merge into main
        ↓
Delete Feature Branch
The exact workflow can differ between teams, but understanding this cycle gives beginners a strong foundation.
Git Workflow Example
Imagine you are adding a search feature.
Start from the latest main:
git switch main
git pull origin main
Create a branch:
git switch -c feature/searchMake your code changes.
Check the changes:
git status
git diff
Stage the files:
git add .Commit:
git commit -m "Add search feature"Push:
git push -u origin feature/searchThen open a pull request on GitHub.
After review and testing, merge the pull request into main.
This workflow keeps the feature separate from the main development line until it is ready.
Frequently Asked Questions
What is Git and why should I use it?
Git is a distributed version control system that records changes to files and helps developers manage project history, branches and collaboration.
Is Git the same as GitHub?
No. Git is the version control system, while GitHub is an online platform that hosts Git repositories and provides collaboration features.
How do I create a new Git repository?
Navigate to your project folder and run:
git initGit’s official documentation uses git init to create a new repository.
How do I create a new branch?
You can use:
git switch -c feature-nameor the traditional:
git checkout -b feature-nameWhat does git add do?
git add stages changes so they can be included in the next commit.
What does git commit do?
git commit records staged changes as a new snapshot in the repository history.
What does git push do?
git push sends local commits to a remote repository.
What does git pull do?
git pull retrieves changes from a remote repository and integrates them into the current branch according to the configured pull behavior.
What is a pull request?
A pull request is a proposal to merge changes from one branch into another so the changes can be reviewed and discussed before merging. GitHub documents this as a core collaboration workflow.
Should beginners learn Git rebase?
Yes, but start with the basics first. Understand commits, branches, pull, push and merge before using rebase regularly.
Is Git difficult to learn?
Git has a learning curve because it introduces concepts such as staging, commits, branches, remotes and history. However, the basic workflow can be learned step by step through regular use.
Key Takeaways
- Git is a distributed version control system for tracking project changes.
- Git and GitHub are different tools that are often used together.
git initcreates a repository.git addstages changes.git commitrecords changes in project history.- Branches let you isolate features and bug fixes from the main development line.
- GitHub provides pull requests for reviewing and merging changes.
git statusandgit diffare useful everyday commands.- Rebase can help reorganize commit history but should be used carefully on shared branches.
--force-with-leaseis preferable to blindly force-pushing when rewritten history must be pushed.- Clear commits, meaningful branch names and focused pull requests make collaboration easier.
Conclusion
Learning how to use Git becomes much easier when you approach it as a simple workflow rather than trying to memorize every command at once.
Start by installing Git and configuring your identity. Create or clone a repository, make changes, stage them and commit them with clear messages. Once you are comfortable with the basics, introduce branches so features and fixes can be developed separately from main.
GitHub can then extend this workflow by allowing you to push branches, create pull requests, request reviews and merge completed work.
As your projects become more advanced, you can explore rebase, stash, hooks, submodules and reflog. You do not need to master every Git command on day one.
The most important step is building a consistent workflow: check your status, make focused changes, commit meaningful work, keep branches organized and review changes before merging.
For developers working with modern software projects, Git provides a reliable foundation for managing code history and collaborating without losing track of changes.
Related Reading
Web Application Security Explained
AI Automation Software Explained
Official Sources
Git Documentation – git switch
Git Documentation – git rebase
GitHub – Creating a Repository