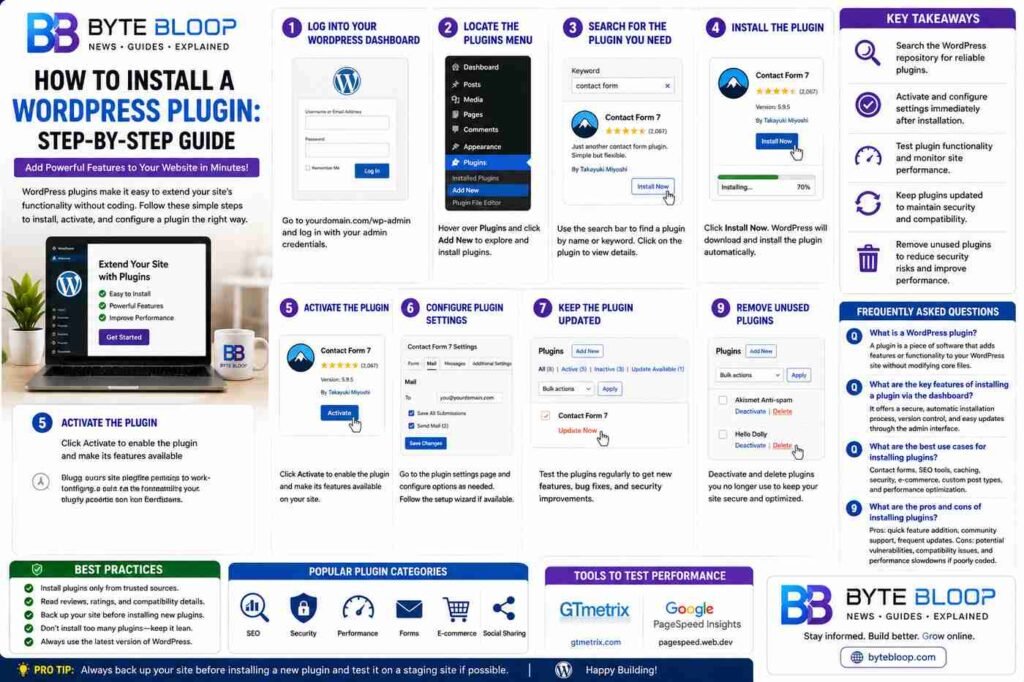
How to Install a WordPress Plugin: Step-by-Step Guide
Introduction
WordPress powers more than 40% of the web, and its flexibility comes from a vast ecosystem of plugins. Whether you’re adding a contact form, boosting SEO, or creating custom post types, installing a plugin is often the fastest way to extend your site’s functionality. A well‑chosen plugin can save hours of coding, but installing it incorrectly can lead to security risks or performance hiccups. This guide walks you through the safest, most efficient process for adding a plugin, from searching the repository to troubleshooting common errors. You’ll learn how to keep your site secure, how to test new features before going live, and how to manage plugin updates to stay current with WordPress core changes. By the end, you’ll be confident that installing a plugin is a routine task, not a technical hurdle. Let’s dive into the step‑by‑step process that even a beginner can follow.
Step 1: Log into Your WordPress Dashboard
Begin by accessing the admin area of your site. The URL is typically yourdomain.com/wp-admin. Enter your username and password, then click Log In. Once inside, you’ll see the familiar WordPress menu on the left. This is where all plugin management happens.
Step 2: Locate the Plugins Menu
On the left‑hand menu, hover over Plugins and click Add New. You’ll be taken to the plugin discovery page, which displays popular, recommended, and featured plugins. This page also houses the search bar and the Add New button at the top.
Step 3: Search for the Plugin You Need
Use the search field to find the plugin by name or keyword. WordPress.org’s repository hosts over 100,000 plugins, so a precise search saves time. As you type, results appear instantly. Click on a plugin’s title to view its details page, where you’ll find the description, version, rating, and support forum.
Step 4: Install the Plugin
On the plugin’s details page, click the blue Install Now button. WordPress will download the plugin’s ZIP file, extract it, and place it in the wp-content/plugins folder. A progress bar shows the installation status. Once finished, the button changes to Activate.
Step 5: Activate the Plugin
Click Activate to enable the plugin. Activation runs any setup scripts the plugin requires and makes its features available. Some plugins add new menu items or settings pages; others integrate directly into posts or pages. Verify the plugin’s presence by looking for new items in the admin menu or by checking the Plugins list for an Active status.
Step 6: Configure Plugin Settings
Many plugins need configuration before they’re useful. Look for a new menu item or a settings link under the plugin’s name in the Plugins list. Common settings include API keys, display options, and feature toggles. Follow the plugin’s documentation or the on‑screen prompts to complete the setup. If the plugin offers a wizard, use it to streamline the process.
Step 7: Verify Functionality and Performance
After activation, test the plugin’s core features on the front end. For example, if you installed a contact form, submit a test entry. Check the site’s speed using tools like GTmetrix or Google PageSpeed Insights. A poorly coded plugin can slow your site; if you notice performance drops, consider disabling it or looking for an alternative.
Step 8: Keep the Plugin Updated
WordPress regularly releases updates that patch security vulnerabilities and add new features. In the Plugins list, you’ll see a notification if an update is available. Click Update Now to keep the plugin current. It’s best practice to enable automatic updates for critical plugins, but always review the changelog before applying major updates.
Step 9: Remove Unused Plugins
Over time, you may accumulate plugins that you no longer use. Unused plugins still pose security risks. To remove a plugin, go to Plugins → Installed Plugins, click Deactivate, then Delete. Confirm the deletion to free up server resources.
Key Takeaways
- Search the WordPress repository for reliable plugins
- Activate and configure settings immediately after installation
- Test plugin functionality and monitor site performance
- Keep plugins updated to maintain security and compatibility
- Remove unused plugins to reduce security risks
Frequently Asked Questions
What is a WordPress plugin?
A plugin is a piece of software that adds specific features or functionality to a WordPress site, such as contact forms, SEO tools, or e-commerce capabilities.
What are the key features of installing a plugin via the dashboard?
The dashboard method offers a secure, automatic installation process, version control, and easy updates through the admin interface.
What are the best use cases for installing plugins?
Plugins are ideal for adding contact forms, caching, SEO optimization, security hardening, e-commerce carts, and custom post types without custom coding.
What are the pros and cons of installing plugins?
Pros include rapid feature addition, community support, and frequent updates. Cons involve potential security vulnerabilities, compatibility issues, and site performance slowdowns if poorly coded.
Conclusion
Based on the available information and industry analysis, installing a WordPress plugin is a straightforward, low‑risk process that empowers site owners to enhance functionality efficiently. By following the step‑by‑step guide, users can ensure secure, optimized, and maintainable plugin integration, ultimately delivering a richer user experience and stronger site performance.
Related Reading
- Top 10 WordPress Plugins for SEO in 2026
- How to Build Your Own WordPress Plugin from Scratch