How to Install a WordPress Theme: Step-by-Step Guide
Introduction
WordPress themes are the visual foundation of any website, controlling layout, typography, colors, and often advanced functionality. Whether you’re launching a personal blog, a portfolio, or an e‑commerce store, the right theme can accelerate development and improve user experience. Installing a theme is a straightforward process that can be done entirely within the WordPress dashboard or via FTP for more advanced users. Choosing the correct theme involves understanding your site’s goals, audience, and required features. Once installed, you can customize settings, widgets, and menus to tailor the appearance to your brand. With regular updates and support, a well‑maintained theme keeps your site secure and compatible with the latest WordPress core releases. This guide walks you through every step, from selecting a theme to activating and customizing it, ensuring you’re ready to create a polished site in minutes.
1. Prepare Your Theme File
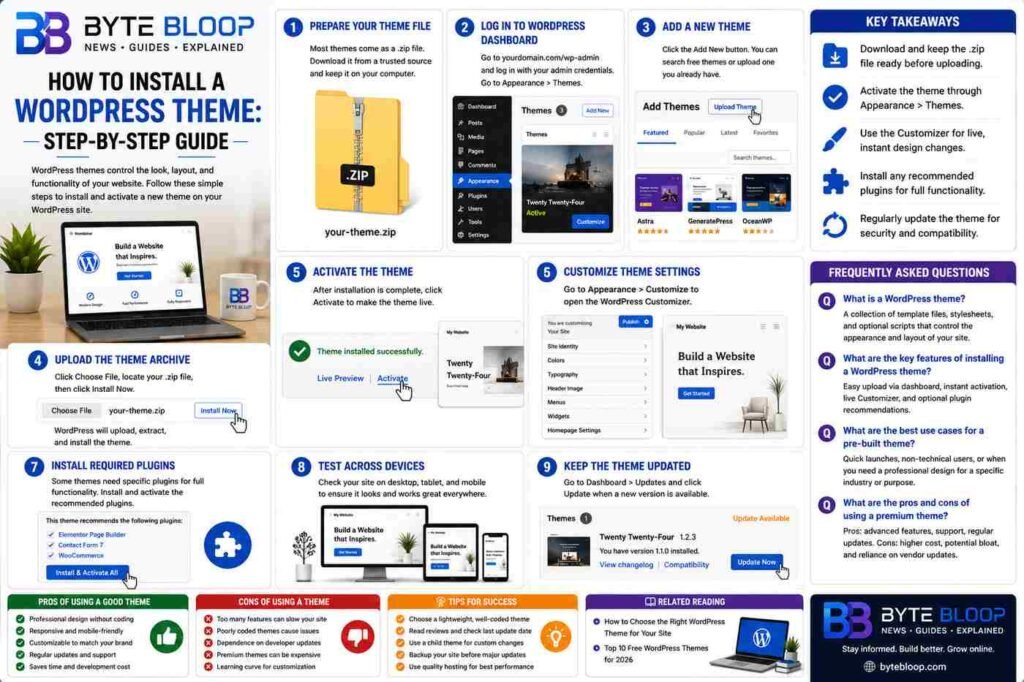
Most themes are distributed as a .zip archive. Download the file from the theme provider, whether it’s the WordPress Theme Directory, a third‑party marketplace, or a custom developer build. Keep the archive on your local machine; you’ll need it when you upload.
2. Log into the WordPress Dashboard
Navigate to yourdomain.com/wp-admin and sign in with your admin credentials. From the left‑hand menu, select Appearance and then Themes. This screen lists all themes currently installed and the one that’s active.
3. Add a New Theme
Click the Add New button at the top of the Themes page. You’ll see a search bar and featured themes. To upload a theme you already have, click Upload Theme on the left side of the screen.
4. Upload the Theme Archive
Click Choose File, locate the .zip file you downloaded, and then click Install Now. WordPress will extract the files and run a quick integrity check. If the upload succeeds, you’ll see a confirmation banner.
5. Activate the Theme
After installation, click Activate to make the theme live. Your site’s front end will now reflect the new design. If the theme includes a demo importer, you can import sample content to see how the theme looks with realistic data.
6. Customize Theme Settings
Navigate to Appearance → Customize to access the WordPress Customizer. Here you can adjust colors, fonts, header layout, and more. Many premium themes provide additional options via a dedicated theme panel or a separate plugin. Use the live preview to see changes instantly before publishing.
7. Install Required Plugins
Some themes depend on specific plugins for full functionality. After activation, WordPress may display a notice prompting you to install recommended plugins. Install and activate them to unlock all theme features such as sliders, page builders, or e‑commerce support.
8. Test Across Devices
Open your site on a desktop, tablet, and mobile phone to ensure the theme responds correctly. Check page load times, navigation, and form functionality. If issues arise, consult the theme’s documentation or support forum.
9. Keep the Theme Updated
Regular updates patch security vulnerabilities and add new features. In the Dashboard, go to Updates and click Update next to the theme name when an update is available. Enable automatic updates for peace of mind.
Key Takeaways
- Download and keep the .zip file ready before uploading
- Activate the theme through the Dashboard’s Appearance → Themes page
- Use the Customizer for live, instant design changes
- Install any recommended plugins to unlock full theme functionality
- Regularly update the theme to maintain security and compatibility
Frequently Asked Questions
What is a WordPress theme?
A WordPress theme is a collection of template files, stylesheets, and optionally JavaScript that defines the visual layout and design of a WordPress site.
What are the key features of installing a WordPress theme?
Key features include a simple upload via the Dashboard, instant activation, a live Customizer for design tweaks, and optional plugin recommendations for extended functionality.
What are the best use cases for a pre‑built theme?
Pre‑built themes are ideal for quick launches, non‑technical users, and when a specific design or industry focus is needed without custom coding.
What are the pros and cons of using a premium theme?
Pros: advanced features, dedicated support, regular updates, and polished design. Cons: higher cost, potential bloat, and reliance on vendor updates.
Conclusion
Based on the available information and industry analysis, installing a WordPress theme is a straightforward, low‑risk process that empowers site owners to rapidly deploy professional designs and functionalities. By following the step‑by‑step steps outlined above—preparing the theme file, uploading via the Dashboard, activating, customizing, and maintaining updates—users can ensure a secure, responsive, and visually appealing website that meets their business or personal goals.
Related Reading
- How to Choose the Right WordPress Theme for Your Site
- Top 10 Free WordPress Themes for 2026