How to Set Up WordPress: Step-by-Step Guide
Introduction
WordPress powers more than 40% of the web, offering an accessible platform for blogs, portfolios, e‑commerce sites, and corporate pages. Whether you’re a freelancer, a small business owner, or a hobbyist, setting up a WordPress site can feel daunting without a roadmap. This guide breaks the process into clear, manageable steps, from choosing a domain to publishing your first post, ensuring you’ll launch a professional site without unnecessary friction. We’ll cover the essential decisions—hosting, theme selection, and essential plugins—while highlighting best practices that keep your site secure and fast. By the end, you’ll have a live WordPress site ready for content creation, and you’ll understand the fundamentals that support long‑term growth and maintenance. Let’s dive into the step‑by‑step journey that turns a blank domain into a fully functional website.
1. Pick a Domain and Hosting Provider
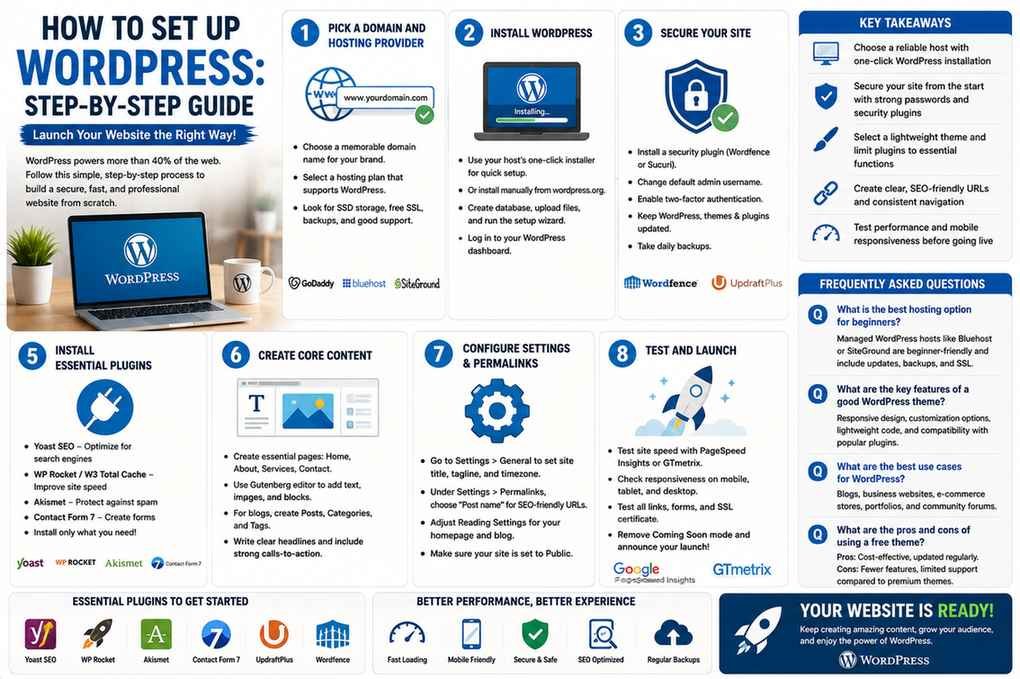
Start by selecting a memorable domain name that reflects your brand or niche. Once you have a domain, choose a hosting plan that supports WordPress. Many providers, such as GoDaddy, Bluehost, and SiteGround, offer one‑click WordPress installations and optimized environments. When evaluating plans, look for SSD storage, automatic backups, and free SSL certificates to ensure speed, reliability, and security.
2. Install WordPress
Most hosts provide a simple installer in their dashboard. Log into your hosting control panel, locate the WordPress icon, and follow the prompts. If you prefer manual installation, download the latest WordPress package from wordpress.org, upload the files to your server via FTP, create a MySQL database, and configure wp-config.php. After the setup wizard completes, you’ll receive a login URL to access the admin dashboard.
3. Secure Your Site
Security should be a priority from day one. Install a reputable security plugin such as Wordfence or Sucuri to monitor for malware and block malicious traffic. Change the default “admin” username to something unique, enable two‑factor authentication, and keep WordPress core, themes, and plugins updated. Back up your site daily using a plugin like UpdraftPlus or via your host’s backup service.
4. Choose and Customize a Theme
Navigate to Appearance > Themes > Add New to browse free themes or upload a premium theme from a marketplace. Preview multiple themes to find one that matches your design vision and functionality needs. Once you activate a theme, use the Customizer (Appearance > Customize) to adjust colors, typography, and layout options. For advanced styling, consider child themes to preserve updates while customizing CSS.
5. Install Essential Plugins
Plugins extend WordPress’s core capabilities. Start with a few essentials: Yoast SEO for search engine optimization, WP Rocket or W3 Total Cache for caching, Akismet for spam protection, and Contact Form 7 for simple forms. Keep plugins lean—install only what you need—to avoid bloat and potential conflicts.
6. Create Core Content
Begin building pages such as Home, About, Services, and Contact. Use the Gutenberg block editor to add text, images, and multimedia. For blogs, create a Posts section and set up categories and tags to organize content. Ensure each page has a clear headline, concise copy, and a call‑to‑action that guides visitors toward your goals.
7. Configure Settings and Permalinks
In Settings > General, set your site title, tagline, and time zone. Under Settings > Permalinks, choose a URL structure that is SEO friendly—typically “Post name”. Adjust reading settings to control the number of posts displayed on the front page and ensure that your site is set to public.
8. Test and Launch
Before announcing your site, test its performance and usability. Use Google PageSpeed Insights or GTmetrix to identify speed issues, and test on multiple devices to ensure responsiveness. Check all links, forms, and security certificates. Once satisfied, remove any “Coming Soon” pages and announce your launch via social media, email newsletters, and local directories.
Key Takeaways
- Choose a reliable host with one‑click WordPress installation
- Secure your site from the start with strong passwords and security plugins
- Select a lightweight theme and limit plugins to essential functions
- Create clear, SEO‑friendly URLs and consistent navigation
- Test performance and mobile responsiveness before going live
Frequently Asked Questions
What is the best hosting option for beginners?
Many beginners opt for hosts that offer managed WordPress services, such as Bluehost or SiteGround, which provide automatic updates, backups, and SSL certificates.
What are the key features of a good WordPress theme?
Responsive design, customizable layout options, lightweight code, and compatibility with popular plugins are essential features of a quality theme.
What are the best use cases for WordPress?
WordPress excels in blogs, business websites, e‑commerce stores via WooCommerce, portfolios, and community forums.
What are the pros and cons of using a free theme?
Free themes are cost‑effective and often updated, but they may lack advanced customization options and dedicated support compared to premium themes.
Conclusion
Based on the available information and industry analysis, setting up WordPress step by step empowers creators to launch professional websites quickly and securely. By following a structured process—choosing the right host, installing WordPress, securing the site, selecting a suitable theme, adding essential plugins, and testing performance—users can build scalable sites that meet modern standards for speed, security, and user experience.
Related Reading
- Top 10 WordPress Themes for 2026
- How to Optimize WordPress for SEO