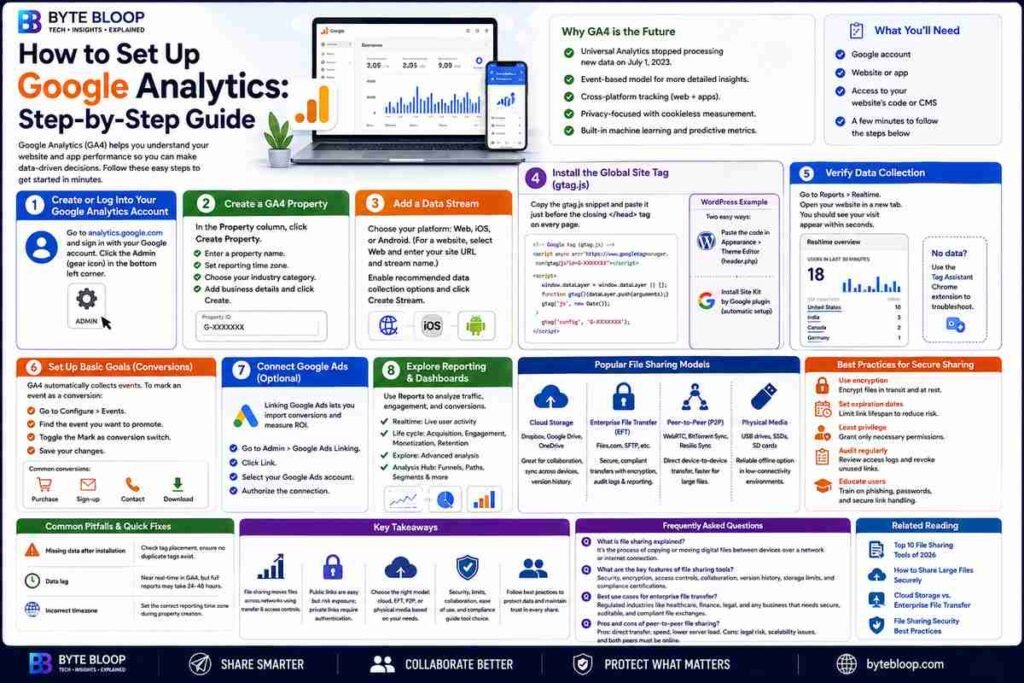
How to Set Up Google Analytics: Step-by-Step Guide
Introduction
Google Analytics has become the industry standard for tracking website and app performance, offering insights that drive data‑driven decisions. Whether you’re a small business owner, a marketing professional, or a developer, knowing how to set up Google Analytics correctly is essential for capturing accurate traffic data, user behavior, and conversion metrics. The platform’s new GA4 version introduces a streamlined interface and event‑based tracking, making it easier to unify web and app analytics. However, the initial setup still requires a clear, methodical approach to avoid missing critical data points.
In this guide, we walk through every step of the setup process, from creating an account to verifying data collection and configuring basic goals. We’ll cover the differences between Universal Analytics and GA4, explain why you should adopt GA4 for future‑proofing, and provide practical examples of how to embed the tracking code on popular content management systems. By the end, you’ll have a fully functioning analytics property that delivers actionable insights.
Step 1: Create or Log Into Your Google Analytics Account
Begin by visiting Google Analytics and signing in with your Google account. If you don’t have an account, you’ll be prompted to create one. Once logged in, click the Admin gear icon in the bottom left corner.
Why GA4 is the Future
Google announced that Universal Analytics will stop processing new data in 2023, making GA4 the recommended platform. GA4’s event‑based model allows you to track custom interactions without additional code, and its cross‑platform reporting unifies web and app data.
Step 2: Create a GA4 Property
In the Property column, click Create Property. Enter a name, set the reporting time zone, and select your industry category. Click Next to add business details, then Create. You’ll be presented with a property ID (e.g., G‑XXXXX) and a data stream.
Step 3: Add a Data Stream
Choose the platform you want to track: Web, iOS, or Android. For a website, click Web and input your site URL and stream name. Enable the recommended data collection options (Enhanced Measurement, User‑ID, etc.) and click Create Stream. The stream page will display a Measurement ID and a snippet of the global site tag.
Step 4: Install the Global Site Tag (gtag.js)
Copy the gtag.js snippet from the data stream setup. Insert it just before the closing </head> tag on every page you wish to track. If you use a CMS like WordPress, you can paste the code into the theme header or use a plugin such as Insert Headers & Footers. For static sites, add the snippet to your template file.
Example for WordPress
Navigate to Appearance > Theme Editor, open header.php, and paste the snippet above </head>. Save the changes. Alternatively, install the Site Kit by Google plugin, which automates tag insertion.
Step 5: Verify Data Collection
After adding the tag, return to the GA4 property and open Realtime reports. Visit your site in a new browser tab; you should see a live visitor count appear within seconds. If no data shows, use the Tag Assistant Chrome extension to troubleshoot.
Step 6: Set Up Basic Goals (Conversions)
GA4 tracks events automatically (e.g., page views, scrolls). To mark important actions as conversions, navigate to Configure > Events. Find the event you want to promote, toggle the Mark as conversion switch, and confirm. Common conversions include newsletter sign‑ups, product purchases, or contact form submissions.
Step 7: Connect Google Ads (Optional)
For marketers, linking Google Ads allows you to import conversion data and track ROI. In the Admin panel, click Google Ads Linking, select your account, and follow the prompts to authorize the connection.
Step 8: Explore Reporting and Dashboards
Navigate to Reports to view real‑time traffic, acquisition channels, user engagement, and more. Customize dashboards by dragging widgets, and use the Explore tab for advanced analysis. GA4’s new Analysis Hub offers freeform exploration, funnel analysis, and path analysis.
Common Pitfalls and Quick Fixes
- Missing data after installation: double‑check the tag placement and ensure no duplicate tags exist.
- Data lag: GA4 processes data in near real‑time, but full reports may take 24‑48 hours.
- Incorrect timezone: set the correct reporting time zone during property creation to avoid skewed daily totals.
Key Takeaways
- GA4 replaces Universal Analytics and offers event‑based tracking for web and app data.
- Creating a property and data stream is quick—just a few clicks in the Admin panel.
- Embedding the global site tag (gtag.js) in your site’s <head> section is essential for data collection.
- Marking key events as conversions turns them into actionable metrics.
- Linking Google Ads unlocks cross‑platform conversion tracking.
- Use Realtime reports to verify the tag is working immediately after installation.
Frequently Asked Questions
What is GA4 and how is it different from Universal Analytics?
GA4 is Google’s latest analytics platform that uses an event‑based data model, unifying web and app tracking. Unlike Universal Analytics, which relies on sessions and pageviews, GA4 tracks every interaction as an event, allowing more granular insights and future‑proofing.
What are the key steps to set up Google Analytics on a website?
1. Create a Google Analytics account and property. 2. Add a Web data stream and copy the Measurement ID. 3. Install the global site tag (gtag.js) in the <head> of every page. 4. Verify data collection via Realtime reports. 5. Mark important events as conversions. 6. (Optional) Link Google Ads.
What are the best use cases for GA4?
GA4 excels for businesses that need unified web and app data, want advanced event tracking without extra code, and require predictive metrics like churn probability. It’s ideal for e‑commerce sites, SaaS platforms, and mobile app developers.
What are the pros and cons of using GA4?
Pros: event‑based model, cross‑platform reporting, free predictive insights, and future support. Cons: learning curve for new users, limited historical data migration from Universal Analytics, and some advanced features still in beta.
Conclusion
Based on the available information and industry analysis, setting up Google Analytics—particularly GA4—provides a powerful, scalable foundation for data‑driven decision making. By following the concise steps outlined above, you can quickly capture accurate traffic, user behavior, and conversion data, enabling you to optimize marketing efforts and improve user experiences across web and mobile platforms.
Related Reading
- Top 10 Google Analytics Reports Every Marketer Should Know
- How to Create Custom Dashboards in Google Analytics 4